Have you ever wanted to take stunning and professional iPhone photos but don’t know how to take product photos with iPhone. If so, then you are not alone.
The iPhone camera takes surprisingly good pictures, yet most people have no idea how to do it. Based on our over ten years of sourcing experience, we have helped thousands of our customers with their product photography problems. Along with improving their high-quality photos, their product sales have grown dramatically.
Do you want to skyrocket your sales with attractive product images? This article will give you some top iPhone photography tips to help you create great photos. So scroll along!
Equipment required for iPhone product photography
The equipment needed for an iPhone photoshoot will vary depending on the shot you’re taking. Generally speaking, shooting product photos, you’ll need three things.
- A tripod or monopod
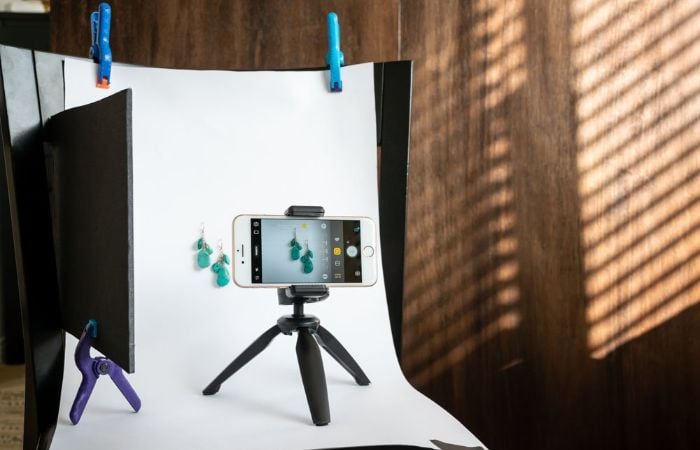
A tripod, or a monopod, is handheld support used for photography or videography. The three legs support the phone, preventing it from falling and reducing the camera shake. A tripod allows you to photoshoot at your desired angles and heights. Without product photos stand, your photos will appear blurry and unprofessional.
A monopod is like a tripod but is usually shorter in length. Monopods are designed for holding a point-and-shoot smartphone or even a DSLR.
- A backdrop
A backdrop is essential to the success of your photos. It provides a versatile yet straightforward environment to work with your smartphone cameras or DSLR camera.
They’re also very inexpensive. A basic white background will last you for years and could even be your primary backdrop for all your photos. They can also help you create interesting effects when combined with other items.

- Product placing table
If you want to get the perfect product placement, you have to plan and set up the shot. That means you need to identify the location that will give you the best opportunity to frame your mobile photography properly.
So think ahead and plan for your product placements, or you could miss out on a shot you wanted.
How to take product photos with iPhone?
Now that you’ve got your phone in hand and set up your camera, it’s time to shoot. But do you have the proper settings? Are you sure? Don’t worry. Check out this quick checklist:
Step1: Finding your iPhone’s best camera settings
To get the perfect product photo like a professional photographer, you will first need to ensure that you have the proper camera settings. There are four major components that you need to focus on: the grid, the camera’s shutter speed, the camera’s lens correction, and Smart HDR.
To set up correctly,
- Press your phone’s “settings” button.
- Turn on all these buttons, as shown in the screenshot.
Step2: Set up your backdrop and lighting
The second step is to set up your backdrop. You can use some cloth that is light and bright. This will help to make the subject stand out more. It will also help lighten up your subject and look more natural. You can find these backgrounds at the dollar store.
You should use a natural light setting for your product shots. Make sure that you set the lighting correctly. Try not to place the artificial light directly on the object. Place the lights a bit farther away.
Step3: Put your iPhone on a tripod
If you want to take your product image to the next level, you should take it with a tripod. A tripod will protect your camera when you take pictures, preventing things from shaking.
Step4: Choose your angle
When taking photos, the camera angle is crucial. You should always use a different angle lens. When taking pictures of a small subject, use a macro lens, and when taking pictures of a big subject, use a wide-angle lens.
Smartphone photographers need to be observant when taking pictures. You will see what your product looks like from different camera angles.
It will help you to capture all the details in your product photo. Use the “rule of thirds” to get the best shot when taking a portrait. This rule says that you should divide the frame into three equal parts vertically and horizontally. It is an easy way to help you to create a better photo.
Step5: Start taking photos
Now that all the settings are done, it’s time to start taking photos. Set your camera up, put your phone on the tripod, and snap away.
You’ll see that many new features in the iPhone have made photography more accessible. But there are still some settings you’ll want to familiarize yourself with, including the following:
- Exposure: Most people don’t realize that even if the camera is on auto, it’s still possible to change the exposure settings to ensure your image is exposed correctly.
- White Balance: There are three white balance presets (incandescent, daylight, and tungsten) and four additional options for customizing white balance. You may want to choose a preset that matches the light source for some shots.
- ISO: This is the sensitivity of the camera to light. There are three ISO settings (100, 200, and 400), but the lower the setting, the longer it takes to take the photo.
- Color: The camera offers Auto, Vivid, Natural, Portrait, Landscape, Sunset, and Black & White modes.
- Autofocus: The focus mode can help the camera automatically adjust its focus.
Step6: Post-processing
The camera on the iPhone doesn’t just let you take amazing pictures; it can also help you edit your photos on the camera roll before you share them on social media. In addition to editing photos using the camera app, you can also use PhotoKit, a collection of apps that allows you to access all of your photo editing options directly in your photo library.You can also use waltr pro to transfer the photo to your Windows, or Mac for further processing in a photo editor If you’d instead not download PhotoKit, many free apps will help you with your editing process.
Looking for the Best China Sourcing Agent?
Leeline Sourcing helps you find factories, get competitive prices, follow up production, ensure quality and deliver products to the door.
5 Tips to improve your iPhone product photography
Product photography is an integral part of the marketing mix, yet it can be challenging to work with limited resources. Here are some product photography tips to consider:
Tip 1: Turn on autofocus and exposure.
To ensure that your pictures have a high degree of focus, you can use the AE/AF lock feature to control the camera’s focus.
Tip 2: Lighten up your product from all angles.
Make sure that your lighting is appropriate for your photoshoot so that you’re not making your photos too bright. If you have a window in your shooting room, you can use natural window light as well.

Tip 3: Take photos from as many angles as possible of the product.
In photography, proper exposure is significant. You don’t want to have an underexposed picture. So, take several close-ups shots from different angles.
Tip 4: Fill in shadows with a reflector.
Reflectors are handy for product photography. You can use a reflector to help bounce the light onto the subject. When you’re outdoor use, a reflect light to help diffuse the sun. If you are in a studio, you can use a reflector to make your product look more natural.
Tip 5: Create a natural look with simple editing techniques.
One of the best ways to edit images is to use the camera app. Simple editing techniques are:
- Decrease shadows.
- Decrease highlights.
- Adjust color temperature.
- Increase contrast.
- Increase sharpness.
- Increase brightness.
- Increase saturation.
- Adjust white balance.
- Increase exposure.
Useful Mobile Apps for iPhone Product Photography
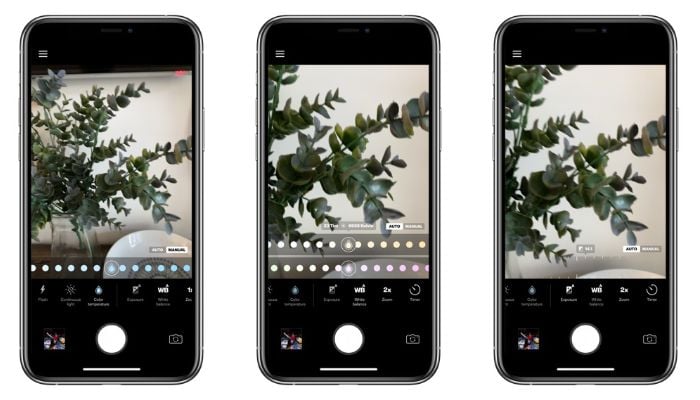
Photo editing and third-party camera apps are excellent tools for enhancing your photos. You can get photo effects and add special effects such as special filters. These effects make your photos look more attractive.
Some useful third party apps for apple iPhone product photography are:
- Adobe Photoshop Express
- Lightroom editing app
- Snapseed
- VSCO
- Camera+
Looking for the Best Chinese Products?
Leelinesourcing helps you find the Best Products Made in China with high quality at an attractive cost.
FAQs about iPhone Product Photography
Can you use iPhone photos for Etsy?
A: Yes, Etsy allows the seller to upload any image, but there are restrictions on what kind of product images you can upload.
Images considered “not safe for work” can’t be uploaded to Etsy. However, if the product images meet certain conditions, they may still be suitable for advertising.
2. Why does iPhone camera quality get worse?
iPhone camera quality does not worsen over time; the camera sensor improves. All sensors become more sensitive and produce higher-quality images over time.
Some people might think that time will affect a camera’s image quality, but it doesn’t. An iPhone camera’s quality does not depend on the amount of time used. Cameras are the same, regardless of whether they are five years old or fifty years old. However, some factors can damage a camera.
These factors can include the lens, the sensor, or the glass protector. If any of these parts are damaged, the camera will begin to show its flaws.
What camera setting is best for iPhone pictures?
The best camera settings for iPhone are:
• Take HDR pictures in low-light situations.
• Use Live photos to capture movement.
• Make use of the iPhone’s camera timer to prevent camera shake.
• Take better photos with the grid.
• Use the portrait mode to achieve blurred backgrounds.
• Shoot in burst mode for a unique image.
What’s Next
Taking professional pictures is a tricky task. It’s best to learn all the tricks before shooting to have an idea about how to take product photos with iPhone.
Always try to use natural lighting for the best possible result. To capture your subject against a bright background, like a white wall, you need to adjust your camera’s exposure, turn off the camera flash, and try to avoid the digital zoom feature. Do not forget about the shutter speed as well. Follow our guidelines, keep it simple and use your creativity to stand out.
Still, searching for trustworthy suppliers and struggling for good product photography? Contact us, we can help you reach new heights in your eCommerce business!