Because of the pandemic, some individuals still have no choice but to order their shoes online. So, shoe photography is still significant and must be taken seriously by online entrepreneurs.
Based on our years of relationships with shoe retailers, shoe images are what sell shoes online. This type of product photography will massively increase your audience reach, so you need to invest time in knowing how to do it.
We wrote this article to teach you exactly how to start taking professional-looking shoe images yourself. Don’t miss these valuable tips and information.

3 Types of shoe photography
Online channels require sellers to provide images for their products. And if you’re selling shoes, these are the three types of creative shoe photography that will make each of your shoe photos stand out from many online channels.
1. Shooting 360
Do you know the BEST way to shoot product pictures? I am impressed with 360-degree SHOOTING.
Shooting 360 is relatively new in footwear photography. This shoe image lets customers view the shoes from as many angles as possible. But, as good as that may seem, 360 shoe photos still don’t fit the image guidelines of some media platforms like Instagram. And this creative shoe photography is not as beginner-friendly as the other shoe photography styles. You might need a professional photographer to shoot decent 360 shoe images.
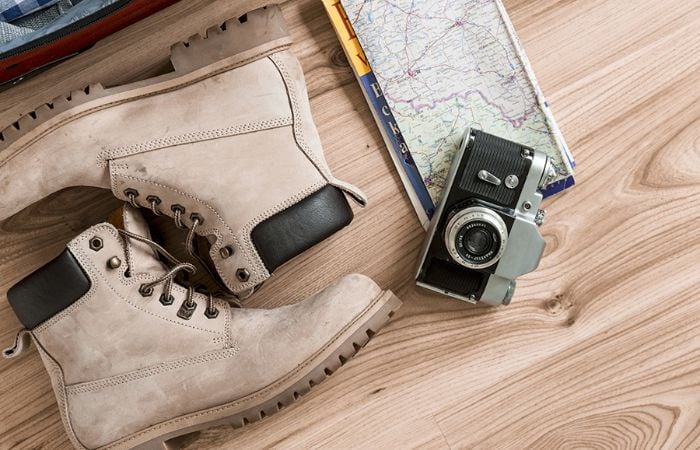
2. Flat Lay Shoe Photography
Blog authors and Instagram sellers popularly use flat lay shoe photography. This shoe photography style is the easiest of all types. In flat lay shoe photography, the pair of shoes are laid flat on a surface with a neutral background like a wood floor. Cluttered backgrounds are a big no-no in flat-lay product photography. Always use a blank space such as a white background to draw maximum attention to the shoes.
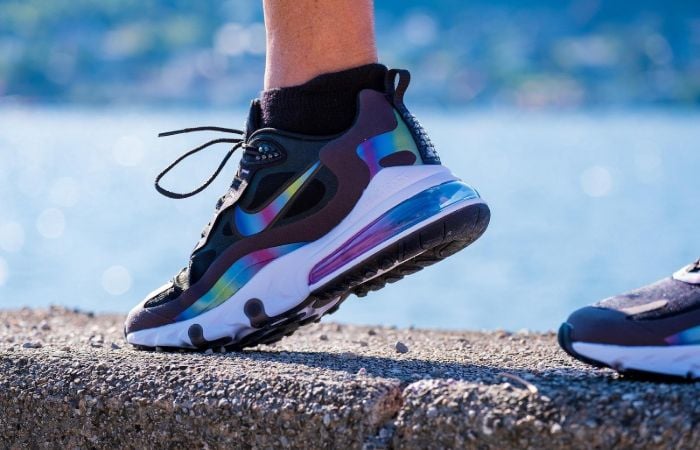
3. Floating Shoe Photography
Floating shoe photography in eCommerce images gives websites a professional appearance. That’s because big companies like Nike and Adidas are often known for using this footwear photography style in their advertisements. In floating shoe product photography, the shoes and the shoe’s straps appear to float in the image. This creative shoe photography requires post-production or photo editing knowledge, so it could be hard for a beginner product photographer. But it’s going to be worth it.
Suggested reading: Amazon Product Photography for Your Website
How do shoe products shoot?
Step 1: Plan
Planning lets you control how your shoe images will turn out. To plan, research footwear images online and ensure that you have all the equipment you need. Decide whether you’ll use a professional camera like a DSLR camera or a phone camera.
Think about your concept and how you will make your images consistent. At this point, you should also plan out your shooting schedules, the number of angles you need for each product, and whether you’re going to do it alone or with someone.
Step 2: Pay attention to details
Serious buyers notice differences quickly. So you need to pay attention to little details like positioning, lighting, and presentability.
My focus is always on the DETAILS. Minor mistakes cost big at this level.
To communicate shape better, try tying dental floss to your shoe straps to control them. You can also stuff shoes with crumpled paper to make them hold their shape when it’s not being worn. Lighting is also essential in paying attention to details. Pay attention to how much light you’re using, as the wrong type of lighting can highlight imperfections in your shoes.
Step 3: Choose the proper background
In photographing shoes, avoid busy backgrounds as they can take away the focus from your shoes. Use neutral or plain backgrounds. White backgrounds are a good starting point in product photography, like shoe photography. They don’t draw attention, and they will allow your shoes to pop out.
Step 4: Choose the best location
For eCommerce purposes, it’s mostly better to stay indoors. When inside, you can easily control factors like lighting and backgrounds. But, if you want to shoot outside, aim for places with soft, natural lighting. Soft light can produce a desirable natural shadow in your product photos.
Also, choose places with a suitable color palette for your product. Avoid locations with overpowering colors and aim for a neutral-colored surrounding.
My recommendation!
The location is CRUCIAL. It must be the BEST PLACE; otherwise, you will lose the AESTHETICS of pictures.
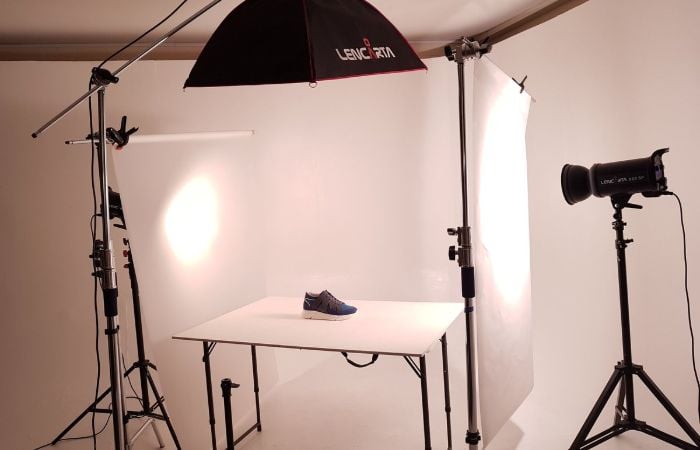
Step 5. Use the appropriate lighting
Like all product photography, avoid direct and harsh lighting in shooting shoes. Too much light casts deep shadows, taking away the whole image’s balance. It will also make it hard to maintain focus throughout your entire shoe image.
Use the proper lighting setup. Don’t overpower your image with light, and likewise, ensure that it’s not too dim.
Step 6: Focus
In every shoe photo, keep the focus on the whole shoe. Customers want to see that product as a whole so make sure that you’re not focusing only on limited aspects of it. Don’t use soft focus or blurred images, as this can break the composition of your image.
Remember to avoid a camera shake. If you’re using your manual camera settings, try to use a faster shutter speed to give images maximum crispness.
Step 7: Shoot from different angles
To find the right angles, experiment with shooting from every position possible.
I compare every shot. Choose the angles. And improve the quality appeal of your product. It gives the BEST photography view.
Your product photos need to show how your shoes look in person, so make sure you’re providing your customers with more than enough images.
Never make the mistake of taking shots from very few angles for your online product portfolio.
Step 8: Post-processing
Once you finish shooting your product images, it’s time for post-production. Post-production is crucial in having professional footwear photography. Remove any flaws you can find in this step and do a background removal if it fits your needs.
Looking for the Best China Sourcing Agent?
Leeline Sourcing helps you find factories, get competitive prices, follow up production, ensure quality and deliver products to the door.
5 Tips to improve your shoe photography shoot
Here are five tips to help you as a beginner shoe or brand photographer.
- Develop A Cropping Template
Cropping too loose or too tight can make transitioning between photos uncomfortable. To ensure that all your images are cropped consistently, develop a template. A template guides how you should lay out your shoes in the final image. And it makes your post-production workflow more efficient.
- Use a White Background
White backgrounds are the easiest way to ensure that you’re not cluttering your image. If you’re unsure where to shoot your shoes, opt for a white background as it’s cheap, convenient, and effective.
Quick Tip: I choose a White background. It is because shooting is easier and at NO COST! (exclude the cost of the photographer)
- Have Enough Soft Light
Both natural light and artificial light can provide you with a soft light. Make sure that you know how to work around the lighting you prefer. When using natural light, aim to shoot in the afternoon just before sunset.
For artificial lighting, consider renting a studio softbox setup to get consistent soft light without much adjustment. For both types of lighting, remember to avoid harsh lighting at all costs.
- Practice Editing Images
Photo editing is crucial in any photography genre. And for product images, it’s the crucial step to having perfect images that can draw customers’ attention. So, invest time in practicing post-production software like Photoshop. Know how to use the brush tool, pen tool, and what the straight lines in your software signify. Knowing how to use these will let you control and modify your images as much as you need. Utilizing an AI photo editor can significantly streamline your editing process, allowing for quick enhancements and adjustments with advanced algorithms.
- Provide Enough Angles
Don’t make the mistake of giving a limited view of your shoes to your consumers. Not showing them every part of your shoes can make them skeptical about your product. It could give the impression that you’re hiding imperfections behind the angles you’re not shooting from. So, always provide photos from surrounding angles.
Example of shoe photography
Let’s say Adidas wants to create shoe photography for their new shoes. These are the steps they’re going to follow.
- Plan how the company wants the shoe images to turn out and the type of shoe photography to be used.
- After planning, the photographer of Adidas will set up their equipment and ensure that there is enough lighting in their shooting area.
- The photographer will place the shoes appropriately and take test shots to see how the shoes would look in an actual image.
Once they have adequate soft lighting and the Adidas shoes are appropriately placed, the photographer will shoot them from various angles and transfer them to post-production software.
They will use their cropping template to crop their new images. After cropping, the pictures will be edited to remove any flaws and improve them as much as possible.
Looking for the Best Chinese Products?
Leelinesourcing helps you find the Best Products Made in China with high quality at an attractive cost.
FAQs about Shoe Photography
How to do shoe photography for Instagram?
If want to shoot shoe images for Instagram, it’s best to stick to flat lay shoe photography. Try to set up a theme throughout all the images in your feed. This way, all of your shoe images will look consistent even if they each feature different pairs of shoes.
How to set up your camera and light in shoe photography?
Use a tripod for your camera in shoe photography. Using manual settings is recommended if you’re using a DSLR camera. Ensure that you have enough light for your lighting and avoid harsh and direct light to your shoes.
How to edit multi-angle photos of your shoes at once?
To edit multi-angle photos of your shoes at once, you can use software like Adobe Lightroom. Lightroom lets you edit multiple images at once, and you can set editing presets so you won’t need to edit each image manually.
What’s Next
Shoe photography should be taken seriously if you want to increase your sales. Shoes are about their visuals as much as they are about usability. Customers want to buy shoes that will look good on them. So let them know that your shoes are visually appealing by making their beauty show in your product images.
Need more suppliers for your shoe business? Click here to get a free quote for your online store needs.